
Shallow Dive: Web Authentication / Session
EDIT: It seems like what I am describing in the post as Session Token is closer to JSON Web Token (JWT) rather than Session Token. But the overall idea is similar for both of them. Here is a great video about Session Token vs JSON Web Token
Context
Even after 5 years of work experience. User authentication / session management has stayed as a black box to me. The lack of knowledge did not block me in any way for my day to day job. There was another team handling the problem; I only needed to focus on my team’s project.
However, as soon as I started to think about building something outside of the company’s context, I became paranoid about the session management and security of the service. Obviously, I am not trying to build a security infra from scratch, but the lack of context was slowing me down on utilizing the existing tools out there.
So, I wanted to use my quarantine time to do a shallow dive on this topic.
Cookie
Before we go on to the main topic, let’s cover Cookie first. Cookie plays a core role in web session management. So what is it?
Cookies are small blocks of data (key/value pairs) set by a web server and stored on a web browser. It is sent back to the web server through the http header for every request to the web server once the value is set.
One common use case of Cookies is a shopping cart for a logged out user. The following diagram demonstrates the interaction between Web Browser and Web Server for adding two items (id:123, 456) to the shopping cart.
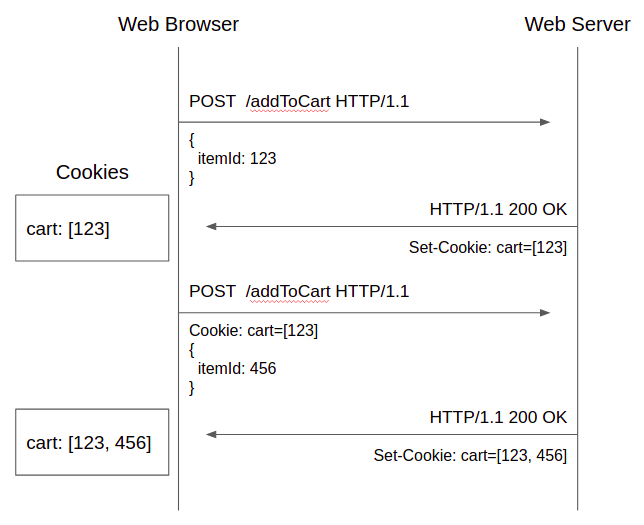
Things to note:
- Cookies are set by the Set-Cookie header in HTTP response from the web server.
- Once Cookies are set, Web Browser always sends back the key/value pairs of Cookes to the subsequent request to the Web Server. That’s why the second addToCart request has “Cookie: cart=[123]” in its request header.
Building a Todo list web site
In this section, we will try to build a simple user session management for a Todo list web site.
The Todo list web site will support.
- A user can register (sign up) to the web site using an email and a password
- A user can login (sign in) to the web site using an email and a password
- A logged in user can add todo item
- Registration Before we can authenticate a user, the user has to register (or sign up) to a web site first. Let’s build an api for registration. This api only takes an email and password for the register.
API pseudo code:
app.post(‘/registration, (req, res) => {
  const hashedPassword = hash(password); // why hash is necessary is a topic that I will skip :)
  db.User.addRow(email, hashedPassword);
  res.sendStatus(200);
});
The web site can have input fields for email and password. Once a user clicks on the “Sign Up” button, the browser can send a request to the api with email and password values to register the user to the web site.
If the user entered ‘newuser@gmail.com’ and ‘newpassword’ as the email and password, the api will add a new row in the User table with the information. Let’s just assume that hash(‘newpassword’) results in ‘hashednewpassword’.
User Table: [
  {email: ‘newuser@gmail.com’, password: hash(hashednewpassword)},
]
- Sign in Now that the user has registered to the web site, we want to enable the user to sign in. Let’s build an api for the sign in. This api also just takes an email and password for the user.
API pseudo code:
app.post(‘/signIn’, (req, res) => {
  const {email, password} = req.body;
  const hashedPassword = hash(password);
  const row = db.User.findRow().where(‘email’, ‘==’, email);
  if (row.password === hashedPassword) {
    res.sendStatus(200);
  } else {
    res.sendStatus(500);
  }
});
The web site can have a sign in page which has input fields for email and password. Once the user enters the email and password pair and presses the submit button, the request will be routed to the signIn API and be processed accordingly.
In our example, if the user enters ‘newuser@gmail.com’ and ‘newpassword’ pair, the sign in process will result in success! Once the browser gets the “success” response, it can show that the sign in was successful to the user.
- Add todo item Yay! So, we are done with the user session management, right? Let’s build an actual feature!
Let’s build an end point to handle adding a todo item. Take a look at the following version where the api only has one parameter, todoitem, as part of a request body.
API pseudo code:
app.post(‘/addTodoItem, (req, res) => {
  const {todoItem} = req.body;
  db.TodoItem.addRow(todoItem);
  res.sendStatus(200);
});
This is not going to work since we don’t know to which user this todoitem belongs to. We can solve this problem by adding an email to the api param, right?
API pseudo code:
app.post(‘/addTodoItem, (req, res) => {
  const {email, todoItem} = req.body;
  db.TodoItem.addRow(email, todoItem);
  res.sendStatus(200);
});
Now, we know the user who added the todoItem and the content of the todoItem. Are we good now? Not quite. With the current design, anyone can add a new todo item in anyone’s account. Even if I am not the ‘newuser@gmail.com’ user, I can just call the api with a request body {email: ‘newuser@gmail.com’, todoItem: ‘todo item’} to add a new todoitem to the account.
One way to solve this issue is to pass a password as well as the email to the api.
API pseudo code:
app.post(‘/addTodoItem, (req, res) => {
  const {email, password, todoItem} = req.body;
  const hashedPassword = hash(password);
  const row = db.User.findRow().where(‘email’, ‘==’, email);
  if (row.password === hashedPassword) {
    db.TodoItem.addRow(email, todoItem);
    res.sendStatus(200);
  } else {
    res.sendStatus(500);
  }
});
- Note that we want to keep the backend api to be a stateless service. So keeping some kind of state on the backend to figure out which authenticated user is calling the api is not an option.
This will work. But some of you might have noticed that there are a few weird things:
- Our addTodoItem endpoint enforces a user to enter email and password for every addTodoItem call. When we use a web site on the internet, we don’t enter an id and password for every action.
- There is no distinction between a logged in user and a logged out user. signIn api is essentially useless at this point.
This is where the concept of Cookies and Session come into the picture. Since we don’t want to make the backend service to be a stateful service, we will leverage Cookies and make a client (Web Browser) to keep track of the state (user session in our case).
2-1. Sign in with Cookies Let’s rewrite the signIn api with the Cookies. In this version, once a user passes the right email and password, Web Server will store logged in user information (session information) using Cookies.
API pseudo code:
app.post(‘/signIn’, (req, res) => {
  const {email, password} = req.body;
  const hashedPassword = hash(password);
  const row = db.User.findRow().where(‘email’, ‘==’, email);
  if (row.password === hashedPassword) {
    res.setHeader({
      ‘Set-Cookie’: `loggedInUser=${email}`
    }).sendStatus(200);
  } else {
    res.sendStatus(500);
  }
});
Once the Cookie is set, the logged in user information will be passed to all subsequent requests to the Web Server. Let’s rewrite the Add Todo Item api.
3-1. Add todo item with Cookies Since add todo item only works for the logged in user, if the Cookie is missing the data, it will redirect the user to the signIn page. If a user is logged in, the Cookie will have the user information, so the user information doesn’t have to be passed through the request body. Request body needs todoitem only.
API pseudo code:
app.post(‘/addTodoItem, (req, res) => {
  const email = req.cookies.loggedInUser;
  if (email === null) {
    res.redirect(‘/signIn’);
  } else {
    const {todoItem} = req.body;
    db.TodoItem.addRow(email, todoItem);
  }
  res.sendStatus(200);
});
However, this version has a similar problem as before. A user may tamper with the Cookie data from Web Browser and change the loggedInUser value to another user’s email to add a new todo item to a random person’s account.
Encryption can help mitigate this issue. Since the client (Web Browser) doesn’t have a need to use Cookie data, Web Server can use encrypted value as a Cookie data instead of a plain text value to prevent a user from tampering.
2-2. Sign In with Cookies with encryption Before setting the email through Cookies, encrypt the value with an encryption key. This encryption key should only be known to the Web Server!
API pseudo code:
app.post(‘/signIn’, (req, res) => {
  const {email, password} = req.body;
  const hashedPassword = hash(password);
  const row = db.User.findRow().where(‘email’, ‘==’, email);
  if (row.password === hashedPassword) {
    const encryptedEmail = encrypt(email, ‘encryptionkey’);
    res.setHeader({
      ‘Set-Cookie’: `loggedInUser=${encryptedEmail}`
    }).sendStatus(200);
  } else {
    res.sendStatus(500);
  }
});
3-2. Add todo item with Cookies Since the encryption key is only known to the Web Server, we can trust that this Cookie data is a value set by signIn api, not something generated by a malicious actor.
API pseudo code:
app.post(‘/addTodoItem, (req, res) => {
  const encryptedEmail = req.cookies.loggedInUser;
  if (encryptedEmail === null) {
    res.redirect(‘/signIn’);
  } else {
    const email = decrypt(encryptedEmail, ‘encryptionkey’);
    const {todoItem} = req.body;
    db.TodoItem.addRow(email, todoItem);
  }
  res.sendStatus(200);
});
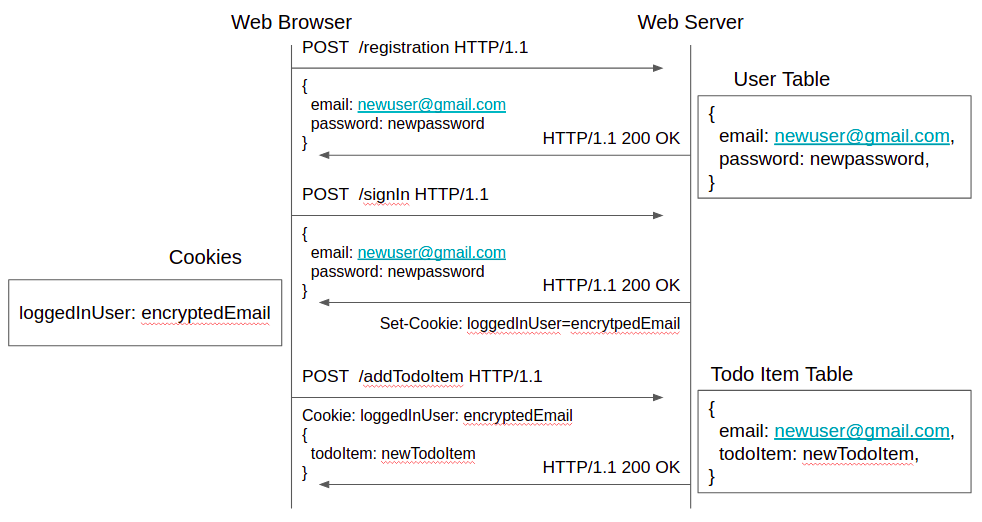
That’s about it! Now, once a user logs into the web site, the web browser keeps the user session (loggedInUser) information (usually called SessionToken, AccessToken) in the Cookie and keeps passing it to Web Server to let the server know that the user is logged in. The following diagram demonstrates the interaction:
Wrapping up
This is a super simplified version of the session management. Hopefully you are not trying to build things from scratch that you don’t need to understand all the details. I don’t know the details either. However, if you want to learn more, here are a few things that I skipped over.
- SessionToken usually holds more information than just the id of a user; It usually includes things like expiration date for the token.
- There are multiple attributes around Cookies. It seems like security sensitive information like SessionToken should be used with attributes like “httpOnly” and “secure” to prevent malicious Javascript code from reading it and to make sure SessionToken is only communicated over ssl to keep it safe.
- SessionToken can be stored in “local storage” or “session storage” of a browser rather than Cookies.
Most of the post’s content are from Everything You Ever Wanted to Know About Authentication